I’ve finally got the picture page up (see the menu bar at the top?)
I’ve put up the Empennage pictures. Imagine that! Closing the left wing and putting up the Emp pix in the same week!
-Dkb
I’ve finally got the picture page up (see the menu bar at the top?)
I’ve put up the Empennage pictures. Imagine that! Closing the left wing and putting up the Emp pix in the same week!
-Dkb
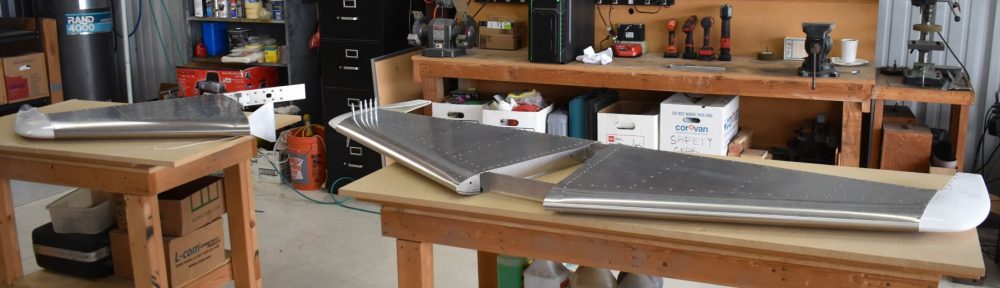
BIG milestone! We closed the left wing! Thanx to Chris for helping finishing the left wing. We can now close the right wing ( just the autopilot servo goes here) and we are done with wings!
More hints to follow!
Many wars have been fought over the choice to prime aluminum or not. Many thoughts, considerations, pros and cons exsist over the use of primer on aluminum aircraft. I made my decision, and I’ll live with it: Minimum primer.
Here are my guiding rules about decisions in building my aircraft.
Avionics is a BIG gray area here. Cessna does not use Dynon Avionics, but how cool is THAT in an experimental aircraft.
Murphy’s Law of Selective Gravitation:
“If while working on a large object with tools (car, airplane, boat, etc.) the dropping of any tool will cause the said tool to roll to the exact center of the object.”

Be sure to build a nice paint stand.
There is a common riveting mistake we will all make. Sometime, the bucking bar holder (usually me) will push the rivet slightly out of the hole, and when the hammer hits, is squeezes funny, and the rivet head stands out slightly. You might be tempted to say “Well, maybe if I hit it again, it will look ok…”
STOP!!!!
Anytime you use the word “maybe” in a sentence like that, you are probably about to make a mistake. Don’t even try. Just drill out the old rivet (these are usually pretty easy) and start again. Don’t give into the temptation of a quick fix that you will regret later.
Murphy’s Law of Thermodynamics:
“Things get worse under pressure”

Rudder
When I was first setting up my empennage, I went over to my shop partners band saw and cut a stiffner down a little. It was aluminum, and not very thick, but still too a great deal of time to cut. Since I had never used a band saw before on aluminum, I did not think much about it. Later I was talking to my hanger partner and told him I had used the band saw, he said “That blade needs replacing. It is a scroll blade and not very sharp.” So, I went out and got a new blade (the right size, and type) and MAN! what a difference it made! Clean, smooth and FAST cuts are now the standard.
So, just a reminder:

Vertical Stabilizer
So, I took the EAA RV builder’s class. I went over to Dan’s house and helped him a little with his RV-7. I bought and built the practice kit. I attended the EAA RV builder’s class a second time with Tom. Built ANOTHER test project. Bought all the right tools, built a very nice work table. Got absolutely EVERYTHING ready. Finally, I got the tail skin together, cleaned and drilled and deburred and READY to go! And when I went to drive my VERY FIRST rivet into my project: BANG! I missed.

BIG dent in tail skin
So, for those of you who have never heard of Murphy’s Laws, here is the First Law:
“If anything can go wrong, it will go wrong”
*sigh*
When working with pre-punched parts, do not be shy about writing on them with a Sharpie©. Getting the correct orientation is half the battle, and keeping the victory means documenting it. Sharpie marks can be easily removed with MEK or Acetone. Keep a gallon of each around. Keep it away from kids tho!
I discovered that if a pre-punched part from Van’s does not appear to fit correctly, I’m probably doing something wrong. Almost NEVER is it a Van’s problem.

Keep Writing!
OK, here is a quick hint. Got cats at home? What can you do with old kitty litter containers? Why, make Cleco holders of course!

Cleco Jug
OK. when you start building your RV-9A, you discover very quickly what OTHER stuff you need to build first. How about the best plane building workbenches ever? Check out the bench and the plans for the EAA Chapter 1000 work bench at: http://www.eaa1000.av.org/technicl/worktabl/worktabl.htm
Note that you do not need to follow the plans EXACTLY. I made a long table and a short table, so I needed to buy only ONE sheet of plywood. Actually, later I bought another sheet to have on top, so I could drill, cut, mar and generally abuse the top, then just give it to the next builder and get another. Here is what that looks like:

Greetings Friends!
Well, after two and a half years of building, I’m finally building the blog! I’m Dave of Tom and Dave and we are building a 2 seater experimental airplane. Since there are thousands of these planes flying, I believe it is more accurate to say we are assembling an aircraft. This is an aluminum design, with a standard aircraft engine with a cruise speed in the 180mph range (we hope). The plane is a Van’s Aircraft RV-9A. This is an aluminum, two-seater side-by-side cross-country plane with a 160 hp engine. Check out the factory at www.vansaircraft.com
So, how does all this start? With a little aluminum.

Empennage kit for a Van's RV-9A